|
|
 |
|||||||||||||||||||||||||||
|
||||||||||||||||||||||||||||
|
||||||||||||||||||||||||||||
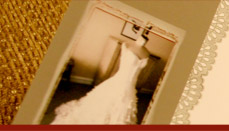
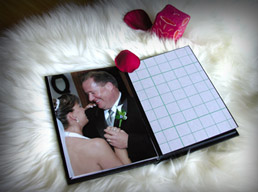
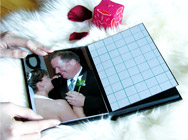
DO self mount albums makes you nervous? Keep your worries away by using our Self Mount album. Our Self Mount albums feature respositionable self adhesive paper on each page. Sounds tricky, but it’s not. Simply peel back the adhesive and mount your prints on the pages. |
||||||||||||||||||||||||||||
 |
||||||||||||||||||||||||||||
| Horizontal: 16”x 12” 14”x 11” 12”x 10” 12”x 8” 10”x 8” 7”x 5” 6”x 4” |
Vertical: 12”x 16” 11”x 14” 10”x 12” 8”x 12” 8”x 10” 5”x 7” 4”x 6” |
|||||||||||||||||||||||||||
| Square: 10”x 10” 12”x 12” |
||||||||||||||||||||||||||||
| Cover Material for Self Mount Album are as Digital Magazine Album (please refer to our sample material in Digital Magazine section) | ||||||||||||||||||||||||||||
` Canvas Photo Cover |
~ Leather ~ Leatherette ~ Linmaster ~ Setalux ~ Cialux |
|||||||||||||||||||||||||||
 |
 |
 |
||||||||||||||||||||||||||
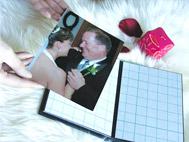
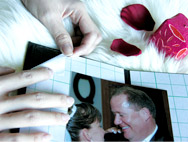
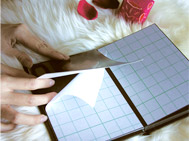
| 1. Take your photo and get ready to mount the photo into the album. | 2. Check out the corner to corner to make sure the photo that you take is correct size. | 3. Peel off the self adhesive paper from left corner first. | ||||||||||||||||||||||||||
 |
 |
 |
||||||||||||||||||||||||||
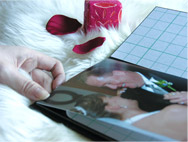
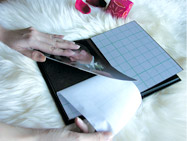
| 4. Make a folded like shown in the picture and fold it down. | 5. Carefully attach the photo start from the upper left hand side corner. Double check the alignment corner to corner until you find the photo is in the right position. | 6. Pull off the self adhesive paper bit by bit. Don’t pull whole area of self adhesive tape at once. | ||||||||||||||||||||||||||
 |
 |
 |
||||||||||||||||||||||||||
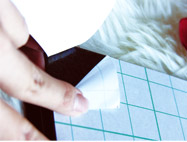
| 7. Slowly sweep self adhesive paper out in the diagonal direction. | 8. Continually peel off the self adhesive paper and sweeping at the top of photo at the same time. | |||||||||||||||||||||||||||
| 9. Finally press entire area of the photo and make sure the page mount too is carefully pressed down. | ||||||||||||||||||||||||||||
|
|
|
|
||||||||||||||||||||||||||